When I had the idea for this blog, it was just after the first flush of summer blooms covered the rose bushes, and now in some places, we are onto our third flush of blooms, which doesn’t look set to finish any time soon. I have to confess that rose care is probably my favourite gardening task. I am also not ashamed to admit that it is rare that I can walk past a rose in bloom, without sinking my nose into its petals to inhale the heady perfume. Is it just me?
Dead-head for repeat flowering
However, like many people, I used to think roses were hard to care for and whilst some cultivars are a little more fragile and temperamental than others, they are, for the most part, one of the most hard-working and value for money plants to have in the garden. After all, some hybrid tea and shrub roses which begin flowering in June/July, when deadheaded regularly, can produce repeat flowers well into November. An impressive feat!
So, I thought I would share a little rose know-how from me to you…
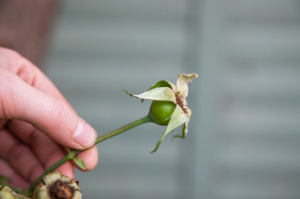
For some roses, once pollinated, if you don’t deadhead, flowering can stop and a hip develops.

A rose develops a hip to produce seeds. Once developing, it produces a hormone that inhibits bud formation and can mean that the rose then waits for another season to bloom again. If not pollinated, the rose will wither, the tip of the stem dries up and the bloom falls off. Repeat bloomers will then develop new stems on which new buds will develop.
So, a good rule of thumb, if you want more flowers (and where practical) is to deadhead roses once they flower. Admittedly, this can be a bit more of a challenge when you have tall climbing varieties, which I will get on to shortly.
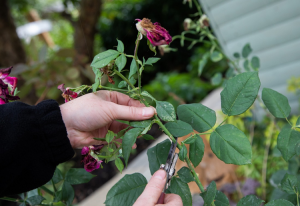
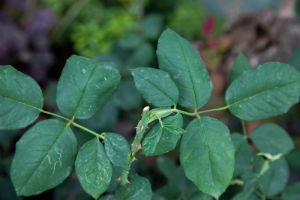
The traditional approach to deadheading is to prune back to a five-leaflet leaf, cutting at an angle, just above a leaflet facing outward. This is easy if the rose produces five-leaflet, but some don’t. If that’s the case you can cut the stems lower on the bush. Once you have done this, you will see lots of new growth begin to develop like this and new buds will begin to emerge.


Climbers vs ramblers
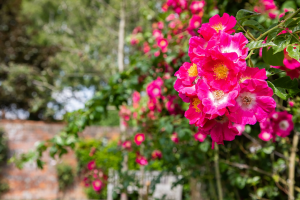
The other often confusing thing when it comes to roses is the difference between a climber and a rambler. The general rule here is that climbers, except from some older varieties, are repeat flowering whereas rambling roses tend to flower once, usually, quite spectacularly, en masse.
Rambling rose

Climbing rose

Now, ramblers and climber require quite different care when it comes to pruning. And if you get this wrong it can ruin your display for next season and the bush will take a while to recover fully.
Ramblers produce flowers on new wood. The best time to identify new stems and tackle pruning is after they have flowered and (once you have untangled the mess of stems) cut out any old wood, keeping any new tender stems separately to tie back in when you have finished.
Climbers produce lateral stems from the main cane which can be old wood. The approach to climbers is to start from the base of the plant and work your way up. Where stems need to come out that are tangled, cut them into pieces as this makes removal easier.
Where a climber hasn’t been cared for a while, climbing and rambling rose care can seem like a daunting task and it can be challenging to know where to start. Equally, if you have a rambler that has been left to go wild for a few years, you may not fancy attempting pruning it yourself. I can’t say I would blame you, as it requires some heavy-duty thorn protection and quite a lot of patience. If this is the case, why not give us a call; Tim and I would be only too happy to tackle it for you. The good news is that, once it is tamed, it gets a lot easier to manage the following season and it may feel more achievable next time, to have a go at it yourself.
P.R.U.N.E.
Whilst doing a bit of research for this blog post, I came across a great acronym for pruning climbers, remember PRUNE.
Prepare the plant – remove any canes which can’t be easily tied back onto the trellis or wires and/or are impeding the process of pruning.
Remove – Remove all deadwood, disease and crossing canes starting off with any spindly ones that are coming out from the bottom of the plant.
Understand – Take a step back and look at the plant, deciding what would like the plant to look like. Consider if you are trying to train it in one direction and identify the main and lateral canes. Main canes come from the base of the plant and lateral canes come off the main canes and are what produce blooms. Train your main canes horizontally. You can even bend some more flexible canes to snake them up your frame/wires in horizontal lines.
Nothing left behind – Make sure any debris and leaves that fell during pruning are cleaned up to minimise the risk of disease or fungi being transmitted to the developing growth.
Enjoy your rose! (if you have properly pruned your rose, this should be a doddle!)
The humble ladybird – your roses best friend
There is one final thing to mention before I sign off for the day as I can’t really get through a post without talking about one of our helpful gardening companions. Today it’s the humble ladybird! Earlier this season, at one of the gardens we tend, we found that the aphids were making light work of stripping many of the climbing roses and hybrid teas. As tempting as it could have been to reach for a rose spray, once I spotted our little red helpers out in force, I took some time to transfer some from plant to plant to encourage them to offer targeted support to deal with the green menace at large. I am happy to report that the problem has been managed well by this method. Another triumph for the Green approach!
Did you know that you can encourage ladybirds into your garden by spraying sugar water on your plants? When aphids are munching away on your plants, they produce a sugary discharge, a little bit of sugar water mimics this and will hopefully draw some polka-dotted helpers to come to your rescue. Alternatively, you can purchase ladybirds from garden centres or on line. The difficulty with releasing ladybirds into your garden is that there is no guarantee that they will stay. But, it is so much better for the local wildlife than reaching for the chemicals.
And with that, I shall sign off for today. Lovely to talk to you all and I look forward to writing to you again soon.
With warm regards
Jenny
New products in the GreenArt shop
We at GreenArt can provide help at any level
From planning a wildlife garden, building hides, constructing ponds and streams, creating paths and planting trees and shrubs.


